Tuesday, November 10, 2015

If you're considering a cedar deck

This will just be a quick post (I could honestly go on for pages but won't. Ha). Here are some considerations if you are looking into a cedar deck. In our old house we had a concrete patio, but after a few years it started to spall and pit and we were not very pleased in its appearance. For the new house we were torn between stamped concrete or a cedar deck. Composite deck was out due to cost. After we got price quotes a 300 square foot cedar deck was roughly double the price of stamped concrete. But we decided on the deck because of how we were turned off by the deterioration of our old one, wanted it to feel like a outdoor living space and feel warmer. 

Long story short, make sure that if you contract the work out you know exactly what you are getting. We went through a reputable company and we were never told the work would be subcontracted out. Loooooong story short, we weren't pleased with all of their work. We basically paid for the equivalent of finish carpentry and got the equivalent of rough. Ultimately we paid only 1/3 of the quoted price. So in that respect we got a good deal. I rebuilt all the railings myself due to the poor workmanship and a few of the deck boards and other odds and ends. All materials ran me about $300 so not too bad. That's one pro of a deck, easily repairable. 

Here's the part that will kick your butt, proper prep and staining. Don't just use a Home Depot stain, think you can slather it on and have good results. I let our deck weather for about 2 months so it would "dry out". 

I used all products made by Defy Stain and am very pleased. First you use a deck cleaner followed by the Brightener. This fully cleans, removes all mill glaze, open the pores and balances the PH of the wood. Then after a few days it was staining time. From start to finish from cleaning to staining, I probably invested 12 hours of time. So this is much more time intensive than a concrete patio. For the first year the instructions say 1 light coat of stain. So next year when I stain again it will be much richer. 

Would we do a deck again and are we happy, yes. BUT in hindsight I would have paid to have had someone do the concrete footers and I would have done it myself. 

Here's some pictures.

Initial framing
Done the first time
Some of their sloppy work
Me tearing it apart

Final product (lighting wasn't the best, but I'm just so done with this project. Lol)


Monday, October 5, 2015

10 months in!!

What is up with all of you Ryan home builders?!? I feel like I haven't been here in forever. When you move in its such a whirlwind. I just wanted to blog to touch base as well as keep a record for us!

So how's your decorating? I am 95% complete now. There are a few more things I need for the walls. I also want to print some canvas prints of family photos for decor too. Then a few more just decorative things. I can't find anything that I really love unless it costs thousands so I think I need to hit the lotto! Haha. 

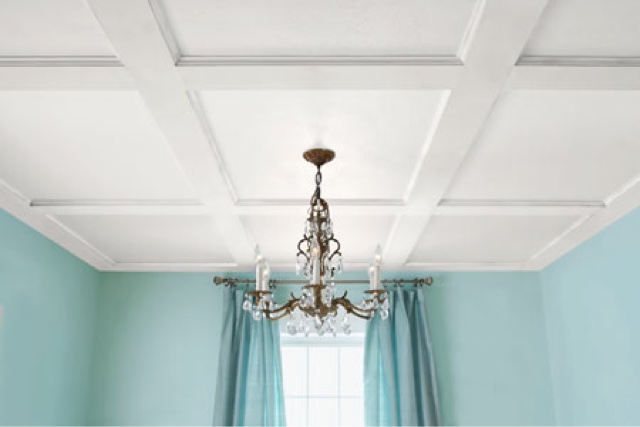
So I asked for coffered ceilings in the dining room for Christmas. LOVE THESE and it's something Jim can do. We might even carry them into the living room too. Fancy, right? I will be sure to update if I get them for the holidays! 


We also had a deck built. People, I can not stress enough that you need to hire a quality contractor cause we were so fooled. We hired a company to do our fence which we were super pleased with. I told Jim that we should get a quote from them for a cedar deck. Well it was in our budget so we decided to go ahead. I've never been so frustrated(well encrypt for with a certain SR here) with a company in my life. They misrepresented that they were the ones who would be doing the work when it was sub contracted out to a different company. Well that company had ZERO pride in work. I could keep going on and on about how crappy they really were but I don't want to get mad again. We ended up with a substantial discount due to their negligence while Jim has been redoing it over the past three weekends. He's currently staining it so that's why it's half one color. I will post pics when it is done! 


This is also something else I asked for. The Naples really has the saddest little "mud entry" so I want to do a built in like this. One project at a time, one at a time... Lol. 

As far as the house goes it's settling. Not too bad but a good amount of nail pops and cracks. We haven't scheduled our 12 month yet so that should get resolved then. We are STILL waiting on this driveway to get rectified. The service manager assured us it would be in the fall but here's fall and we are still waiting. We also still have siding issues. A lot of homes in here do. We are a Hardie board community and it seems they didn't know how to install it. It's very windy so you can hear them flap in the wind. I've been trying to stay on top of the SM to get it taken care of but I think the entire house needs to be face nailed. 

So what's going on with all of your homes? Let me know! I've missed you all! 

Monday, August 24, 2015

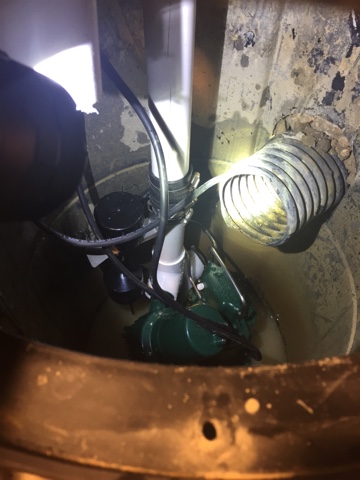
Installing new sump pump


Well, figured it was time to install a backup sump pump. We had a scare last week when our power went out and the water got to within 5" to the top, our basement is unfinished, but that doesn't mean it would be any less of a disaster. I did some research and seeing that the one Ryan installed sells for $65 on eBay also made us realize we should probably just change the whole thing. We did our research and found this Zoeller unit which gets rave reviews. 
http://www.amazon.com/gp/aw/d/B002N6VHXI/ref=mp_s_a_1_1?qid=1440444646&sr=8-1&pi=AC_SY200_QL40&keywords=zoeller+507-0008&dpPl=1&dpID=21YVPf5QdPL&ref=plSrch
It's both a primary and backup. Not cheap, but well worth it. 

So I'll give a fairly in detail installation post. Scale of 1-10, I would say this was a 3. It's not difficult at all, but you do need some basic DIY abilities. Took me about an hour to install, but would have been faster if I didn't take so many pictures. Ha. 

So begin by unscrewing the bolts that hold the cover on and unplug. Clearly don't do this if you recently had a lot of rain. 

Next I just unscrewed the coupling below the check valve and just removed the whole unit. 

From there, unscrew the threaded connection that went into the old sump. 
Unscrewed. 
I next bailed out some water at the bottom of the pit to give myself a clearer view. This is a plastic pit, there should be no debris in the pit, but there was probably 3/4" of rock from construction in the bottom. I removed all of this. So even if you don't plan on replacing your pump, at least check for debris so you aren't burning out your current pump. 
Next I measured from the floor to the top of the new sump pump pipe. The Zoeller is 18", but that's irrelevant. I simply used a paint stirrer and marked it, that way I wasn't getting a good ruler mucked up. 
I then reinstalled the discharge pipe. Then simply stuck the paint stirrer in the pit and transferred the measurement onto the discharge pipe. 
Removed the discharge pipe and then cut. I prefer to use a miter saw. I tape where I cut to keep it cleaner, grip the pipe tight, then do a slow cut. See, perfect cut! 
Then put back in discharge and put new sump in to make sure my measurement was right. 
Removed the discharge again, then slipped the discharge through the plate cover, and then secured the discharge to the sump with the rubber coupling that's included. Here's how it looked. 
Then drop the whole unit into the pit and then secure the discharge to the check valve. 
This took me maybe 30 mins. 

From there I ran a bunch of tests to make sure the primary worked. 

I then hooked up the battery and the charger and ran through those tests. I still have to build a stand/shelf for the battery and charger. We bought a deep cycle marine battery from Sam's Club for $80. 
And here's the underwhelming little baby original pump. 
In closing, so far the Zoeller pump seems beefy and well made. I'll obviously keep an eye on it the next few rains. I see ZERO reason to pay a plumber to install. The 2 pumps in one is the way to go in my opinion. Hope this helps!


Tuesday, June 23, 2015

Siding issues continue

While we love our house, we have always believed the siding installation of the Hardie Board has been substandard. We are clearly in a high wind zone and they do not follow the Hardie best practices for installation. They will not add the extra face nails until you start losing the boards. Last night grind storms several houses lost more boards and we have about 15 loose. Our siding has been knocked loose so many times we are going to demand a total pull off and reinstall. There has been so much unseen damage that there is no way we are going to let them say it's all good, then we lose boards when we are out of warranty. Hardie has not been responsive to our concerns. I believe we will now have to take this to Twitter and go above some heads here. 

Monday, April 27, 2015

Smattering of updates

Been awhile since we've blogged and like to keep the timeline going. 

Got our sod on April 11th and landscaping a few days before that. 
Now nice and green

We painted our office
Replaced the powder room mirror from this:
To this

I'll also blog on some issues we're looking to resolve shortly. 


Friday, March 20, 2015

First major service call done

Well we've been in the house 3 months. We had a variety of small issues pop up and put in multiple service tickets. The Service Manager came out to take care of them or evaluate. Here's the rundown and remedies:
-French door deadbolt wasn't keyed right. He replaced it and fixed on the spot. 
-Evaluated siding we weren't pleased with. He related there are a few problems and they'll gladly replace in Spring. 
-Cracked sidewalk. Will replace in Spring.
-One Ethernet doesn't work. I tried contacting the vendor previously and got a run around. The SM got right on the phone with them and told them to fix it and stop the run around. 
-Kitchen cabinet door that had a sloppy touchup on (we didn't put in a ticket). He said no problem, was sloppy, will order new one and replace. It was just a minor ding, so we're very pleased. 
-Some interior door and drywall issues we'll take care of at the 10 month. 
-Driveway spalling. The SM was very upfront and said he can't make that decision, that decision is above him and will be evaluated in Spring. 

Overall very pleased. He was super nice and attentive and did not fight us on anything. The majority of our issues with paint/trim/drywall will be during the 10 month. 

Also feel free to join our Facebook group!

Saturday, February 28, 2015

Come join our Facebook group!!

Jim and I decided to start a new Facebook group for all the owners of Ryan Homes.

If you are a longtime owner, halfway through the build, or thinking of maybe buying a Ryan you are more than welcome to join us. 

Here is the link:


The group name is the Ryan Homes Owner Group 

Hope to see you all there!! 

Thursday, February 26, 2015

Rooms getting done

Finally putting the finishing touches on some rooms. Seems like we get 90% done, then get distracted and move onto something else. Ha. So family room is finally done. Just hung the curtains. The dining room is basically done other than wanting to hang a family picture canvas on the wall to the left, but we'll have to wait until spring to take it. Also the house across the street from us is almost done. Hope everyone else's progress is going well, and with any luck Spring is around the corner. (Again just crappy cellphone pics)


Friday, February 20, 2015

Crappy concrete work

I'm basically blogging this to establish a timeline and for future reference. Our driveway was poured on Nov. 7th and the sidewalk that goes from the driveway to the front stoop about the same time. One part of the sidewalk is already cracked. The driveway is also spalling badly. All the dark spots that look like kitty litter is the concrete crumbling. No salt was ever placed on the concrete from the snow. I believe too much water was added to the top when they were finishing it and overworked the finish causing it to weaken. I remember the surface in that area looking "wet" for quite awhile. Also the sidewalk crack from not properly compacting the soil. Well, they better have their jackhammers ready come spring to rip the problem areas out and replace. 

Sidewalk 
Driveway


Saturday, February 14, 2015

Siding ripping off!

Well currently high winds here and our siding is ripping off! To say this will be addressed is an understatement!
Now a few hours later.